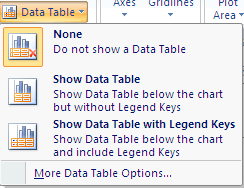
In Excel, you can display a table of the data that you use in the chart. The data table appears below the chart. When you create a chart, you can select a layout that includes a data table. To add a data table to an existing chart, follow these steps:
- Click anywhere on the chart and click the Layout tab to display the chart layout tools on the Ribbon.
- Click the Data Table button and choose an option from the menu. The data table appears below the chart.
- To explore additional formatting options for the data table, choose More Data Table Options from the menu. Excel displays the Format Data Table dialog box.
- Make your selections from the various formatting options and click ok.
Add a Data Table
- Click anywhere on the chart you want to modify.
- Click Chart Tools Layout => Labels => Data Table. Options include a choice not to show a data table, show a data table but not show a chart legend, or to show a data table and include the chart legend.
- Make a Data Table selection.
- Select the Show Data Table option.
- Click OK. A data table, displays at the bottom of the chart showing the actual values.
Data tables can be added to charts on a regular worksheet, but it isn't a common practice because the worksheet itself already displays the data. Data tables display the chart values in a grid beneath the chart. They are very helpful if a reader needs to see exact values along with a graphical display, such as when using a 3-D chart.
Show Data Labels
- Click anywhere on the chart that you want to modify.
- Choose Chart Tools Layout => Data Labels. A menu of data label placement options appears.
- Select a placement option. See the data labels with a placement of Outside End.
- Choose Chart Tools Layout => Data Labels => More Data Label Options. The Format Data Labels dialog box appears.
- If you don't want the data label to be the series value, choose a different option from the Label Options area (such as the series or category names).
- In the Number option, select a number style for the data labels.
- Select any additional options and then click ok.


No comments:
Post a Comment